The estimated reading time 5 minutes
Use ISE as central administration tool (Evolution of ISE profile) part 1
Preface: all information mentioned in this article are based on profile file of ISE, for further information about profilefiles have a look at Microsoft description
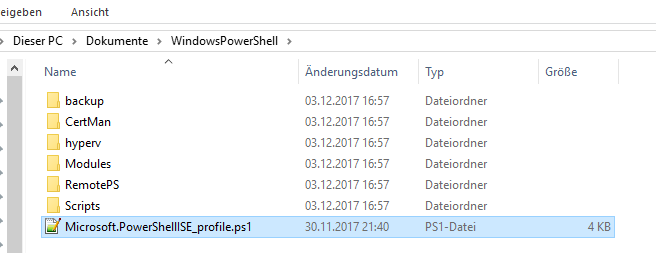
To quickly generate a ISE profile file you can use the following code in your ISE
if (!(Test-Path -Path $PROFILE ))
{ New-Item -Type File -Path $PROFILE -Force }
A new folder and .ps1 file will be generated inside your personal document folder.
Personally I’ve worked with this profile file already some time, but these days it grew and a lot of functions came to it.
Starting with ISE Steroids inside my profile was the first thing I did with this file. Have a look on this simple profile file:
 This small query detects if ISE is started and then starts steroids. Additionally it searches for available updates in steroids.
Further Information LINK
Summer this year I started with ISE Profile again for automating remotepowershell access to servers etc.
Just have a look on my post LINK
1. Backup Addins with profile file
#add ise menu backupprofil
$parentbackup = $psise.CurrentPowerShellTab.AddOnsMenu.SubMenus.Add('Backup', $null, $null)
$parentbackup.Submenus.Add(' BackupPSProfile',{ Invoke-Expression "$env:HOMEPATH\Documents\WindowsPowerShell\Backup\profile-backup.ps1"}, $null) | Out-Null
Take a closer look at the function add with its three parameters <<ADD.(‘name-menu’, ‘Command/invoke’, ‘shortcut’)>> In my example the last two parameters are $null because I don’t want to define a shortcut.
After adding this information your menu in ISE will be extended (if you execute it directly the menu structure will appear in the menu).
So why did we do the additional menu -> I wanted to backup my complete profile path with the profil file, also having versions of this profile folder with date in foldername. In my case the targetbackup is my onedrive folder where it will upload to the cloud.
How does this script look like:
#path to profile file
$updatepath  = 'C:\Users\ak\Documents\WindowsPowerShell'
#path to backupfolder
$backuppath= "C:\OneDrive\powershell-scripting\powershell_profile"
#get date and convert to string
$date=((Get-Date).ToString('yyyy-MM-dd-HH-mm-ss'))
#generate new folder with date in foldername
New-Item -Path  ($backuppath+"\"+$date) -type directory -Force
#if folder not existing throw error
if( -not (Test-Path ($backuppath+"\"+$date)) )
{
   Throw (Logwrite "error generating folder, please check folder")
}
#starting backup with robocopy
else {
    $backuponedrive = "$backuppath"+"\"+"$date"
    robocopy "$updatepath" "$backuponedrive" /mir
    }
2. Remote Powershell Azure AD
Of course other scripts followed to my profile. Now I’m introducing a script to connect to Azure AD Powershell via remote powershell (import-modules is also inculded)
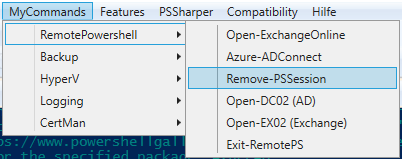
First adding the menu button to “RemotePowershell”

the script for the connection:
#connect azure ad
Import-Module AzureAD -Verbose
Update-Module -Name AzureAD -Verbose
Get-Module -Name AzureAD
$MyCred = Get-Credential
Connect-AzureAD -Credential $MyCred
$user = ($MyCred.UserName).ToString()
#change ISE Editor title
$host.ui.RawUI.WindowTitle = "Remoteconnection to AzureAD with user: $user"
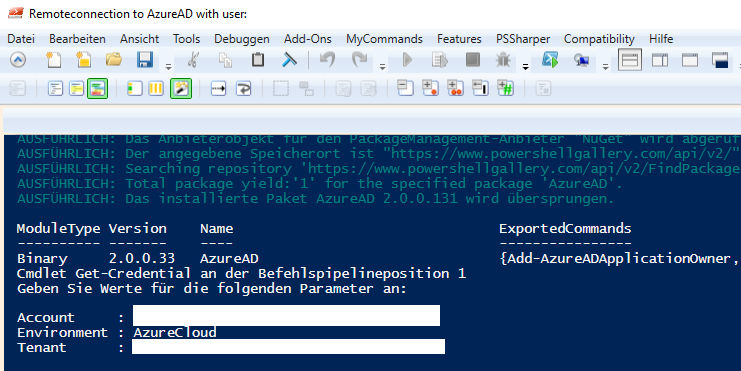
NOTE: titlebar of ISE is also customized and shows the user which was used to connect to azure ad
3. Close Remote Powershell sessions
After finishing all your work with remotepowershell you should close the connection to the remote server (clean shutdown). Also I created a menu button in “remotepowershell”
following script is located behind the button
#exit open powershell session
Get-PSSession | Where-Object {$_.State -eq "Opened"} | Remove-PSSession
$host.ui.RawUI.WindowTitle = "Windows Powershell ISE no connection"
As you can see the remote session will be removed and the titelbar will be customized so everyone can see there is no remote connection active.
There are different ways to end a remote powershell session (short discription here):
- Powershell connects a session to the remote server/system and imports modules in local session (variables also are defined only on local system)
- Second method is called “implicite Remoting” which executes powershell code directly on the remote client/system (so if you import modules it will not be imported locally)
In my example the “Remove-PSSession” is to end PSSession (first ps connection) and “Exit-RemotePS” is to end an implicite Session
Exit-RemotePS:
$parentrps.Submenus.Add(' Exit-RemotePS',{ Invoke-Expression Exit-PSSession; $host.ui.RawUI.WindowTitle = "Windows Powershell ISE no remote connection" }, $null) | Out-Null
With using “invoke-expression” it is possible to execute powershell code on remote computers or servers. (disadvantage: winrs is needed). it is also possible to use “Invoke-Command” but if you do so there are some more parameters to consider.
Have a look at this link: Invoke-Expression VS Invoke-Command
Finally my complete profilefile:
#startup ISE-Steroids
Set-Location C:\temp
if ($psISE)
{
  Start-Steroids
  #Clear-Host
  Write-Host 'ISE-Steriods started!' -ForegroundColor Green
  #check for updates and install
  Update-Module -Name isesteroids
}


#add ise menu remote powershell
$parentrps = $psise.CurrentPowerShellTab.AddOnsMenu.SubMenus.Add('RemotePowershell', $null, $null)
$parentrps.Submenus.Add(' Open-ExchangeOnline',{ Invoke-Expression "$env:HOMEPATH\Documents\WindowsPowerShell\RemotePS\ExchangeOnline.ps1"}, $null) | Out-Null
$parentrps.Submenus.Add(' Azure-ADConnect',{ Invoke-Expression "$env:HOMEPATH\Documents\WindowsPowerShell\RemotePS\azure-ad-connect.ps1"}, $null) | Out-Null
$parentrps.Submenus.Add(' Remove-PSSession',{ Invoke-Expression "$env:HOMEPATH\Documents\WindowsPowerShell\RemotePS\ExchangeOnline-exit.ps1"}, $null) | Out-Null
$parentrps.Submenus.Add(' Exit-RemotePS',{ Invoke-Expression Exit-PSSession; $host.ui.RawUI.WindowTitle = "Windows Powershell ISE no remote connection" }, $null) | Out-Null
#add ise menu backupprofil
$parentbackup = $psise.CurrentPowerShellTab.AddOnsMenu.SubMenus.Add('Backup', $null, $null)
$parentbackup.Submenus.Add(' BackupPSProfile',{ Invoke-Expression "$env:HOMEPATH\Documents\WindowsPowerShell\Backup\profile-backup.ps1"}, $null) | Out-Null
This was the first part.
the second part will describe function logging and certman and will be published soon.