The estimated reading time 3 minutes
Lot of customers in small and medium businesses are using CTI Software for calling and connecting their PC with telephone. In most cases the software is connected to active directory and it’s using or maybe adding the SIP attribute to “proxyaddresses” attribute. Sometimes these software copies UPN (userprincipalname), but often this is not the same as E-Mail address. “False” SIP addresses are the consequences. This article describes how to correct it to the primary mail address. This can also cause issues if you use azure ad connect and want to sign in to skype for business.
NOTE: Only AD Powershell Module and administrative access to ActiveDirectory is needed. I had to do this changes because the customer wants to use Skype for Business and he could not authenticate with his email addresse (azure AD sync enabled of course).
My demo has only three generated users, but this should also work in bigger environments.
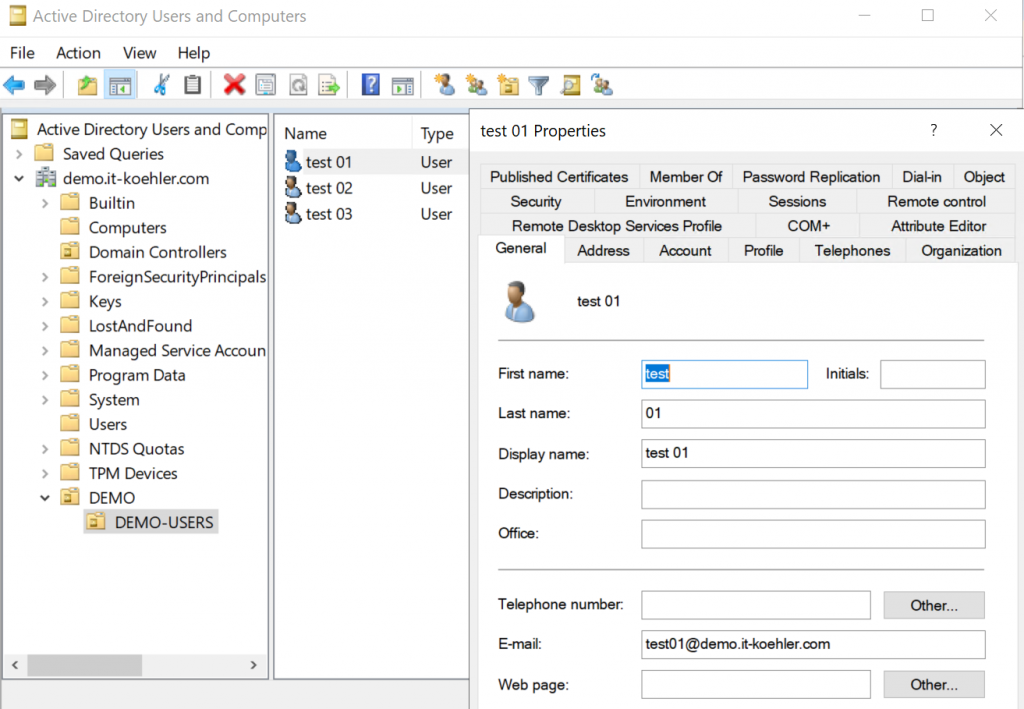
The setup: 3 users, two of them own an email address and have different SIP / SMTP Addresses defined. See my screenshot.
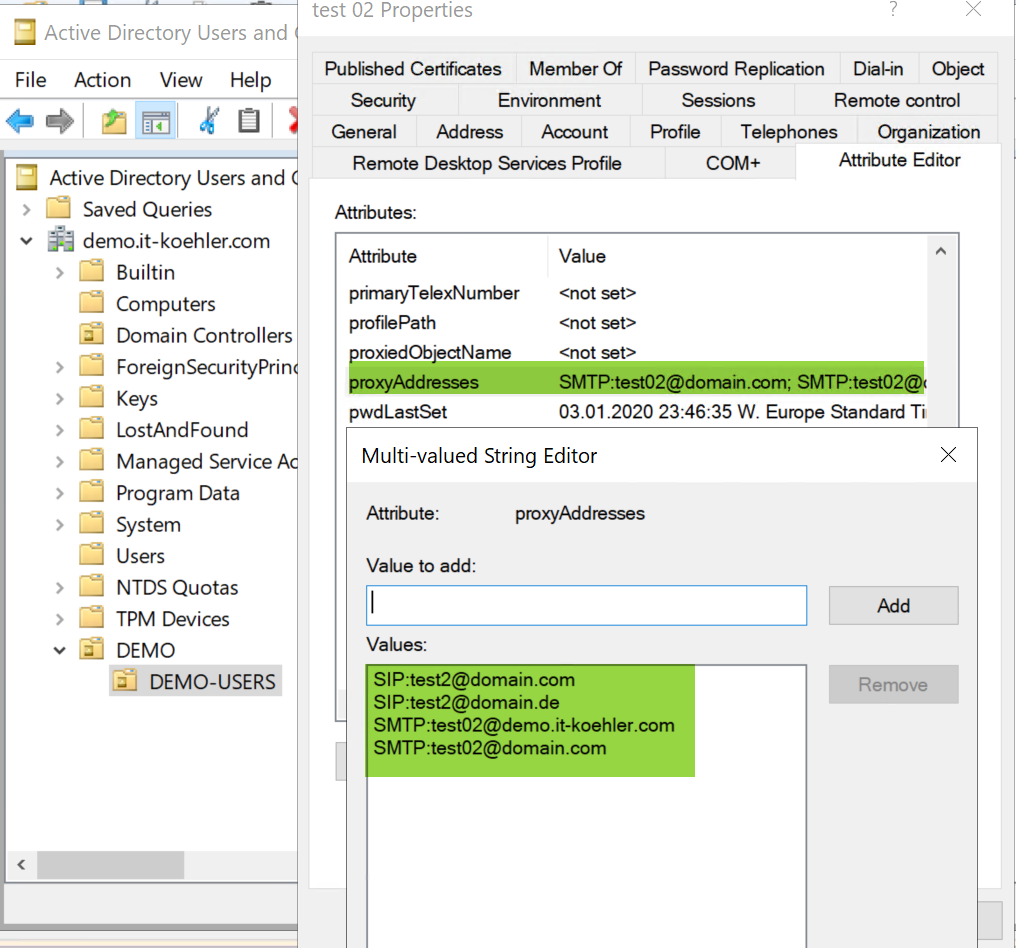
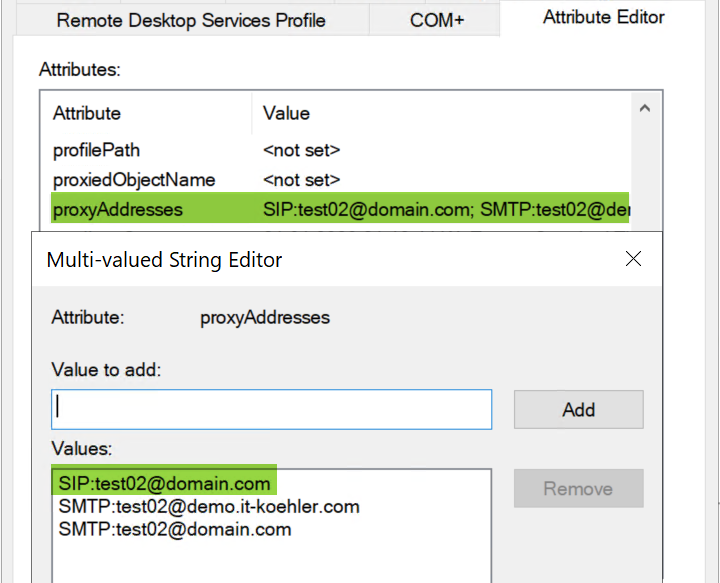
As you can see, there are two SIP addresses and both they’re wrong. You can use ISE or other PowerShell Editors to execute the script.
So what’s my script doing?
1. searching for all users who have an E-Mail address set (attribute mail)
2. exporting all this users SIP addresses (so you can see as it was before) in CSV file
3. Searches for all SIP addresses and removes all SIP addresses
4. Adds SIP address same like E-Mail Attribute
5. Exports the new SIP address to another file
Import-Module ActiveDirectory
#OU Path where users with false SIP addresses are stored (distinguishedName)
$ou = "OU=DEMO-USERS,OU=DEMO,DC=demo,DC=it-koehler,DC=com"
#export path for csv before editing
$exppath = "C:\temp"
$exportpath = "$exppath\sip-orig.csv"
#export path after correction of sip address
$exportpathedit = "$exppath\sip-edited.csv"
# searches and writes all users into varialbe users where E-Mail attribute is not empty and contains @demo
$users = (Get-ADUser -Filter * -Properties * -SearchBase "$ou" | Where-Object {$_.mail -ne $null} | Sort-Object mail)
# NOTE: if you want to filter your mail addresses you can replace the line above with the following line and replace also "@demo"
#$users = (Get-ADUser -Filter * -Properties * -SearchBase "$ou" | Where-Object {($_.mail -ne $null) -and ($_.mail -like "*@demo*")} | Sort-Object mail)
#export to csv before editing anything
# https://www.blackforce.co.uk/2016/09/23/export-list-users-ad-proxy-addresses
$users | Select-Object Name, @{L = "ProxyAddresses"; E = { $_.ProxyAddresses -join ";"}} | Export-Csv -Path $exportpath -Delimiter ";" -NoTypeInformation
#the following code is done for every user found in $users
foreach($user in $users){
  #getting emailaddress
  $email = (($user).mail)
  #getting all SIP addresses from attribute "proxyaddresses"
  $proxy = (($user).proxyAddresses) | Where-Object {$_ -like "*SIP:*"}
  Write-Host "User: $email changed"
   #remove every sip address from user (even if there are more than one)
   foreach ($addr in $proxy){
       Set-Aduser -identity "$User" -Remove @{proxyAddresses="$addr"}
   }
    #adding one sip address from the mail attribute
    Set-ADUser -Identity "$user" -Add @{proxyAddresses ="SIP:"+"$email"}
}
#export all SIP Addresses after editing
$users = (Get-ADUser -Filter * -Properties * -SearchBase "$ou" | Where-Object {$_.mail -ne $null} | Sort-Object mail)
$users | Select-Object Name, @{L = "ProxyAddresses"; E = { $_.ProxyAddresses -join ";"}} | Export-Csv -Path $exportpathedit -Delimiter ";" -NoTypeInformation
You have to change two paths;
First: $ou = “OU=DEMO-USERS,OU=DEMO,DC=demo,DC=it-koehler,DC=com”
Second: $exppath = “C:\temp”
The files csv should look the same, before and after, but it should contain different content

If you have incorrect SIP Addresses you can quickly correct this with the script. Be careful and try some pilot users before changing everybody. Some CTI Software may not like this change.
Have fun with the script. If you like this article please click on “helpful”.

[…] change addresses with the AD attribute editor in attribute “proxyAddresses”. See further information here. In Exchange Online you can find it […]
You sir are an absolut genius!!!
TY for this script, saved me a lot of time fiddling around.
Really appreciate , Your article is helpful and let me change the SIP for users with correct SMTP at the same time.
This is amazing! I will definitely share it with all my friends
good article
I wish to say that this write-up was very pressured me to try and do it
thanks for sharing, i’ll try this teori
Nice post,thanks for sharing
site is fantastic, as smartly as the content!.
and i think the admin of this web page is in fact working hard in support of his website
Just found this and used it, works like a charm. Thanks for your contribution
Thanks for your comment. Hope it will help other people also.
All the best from germany
Alex
Normally I didn’t learn to post on blogs, however I wish to say that this write-up was very pressured me to try and do it! Your writing style has been amazed me. Thank you, quite nice article. where did you learn it?
Hi,
thanks for your comment. most of the skills I studied myself and learned at customer projects. Have a look at my other blogposts.
Have a great day.
Alexander
Some CTI Software may not like this change.